
It’s an exciting week here at Joy In Our Home… 24 of my blogging friends are joining me this week as we share lots of inspiration for spring. Here’s what’s coming this week:
- DIY’s on Monday (that’s me sharing today!)
- Vignettes on Tuesday
- Front Porches on Wednesday
- Mantels on Thursday
- and Recipes on Friday!
Each day there will be 5 bloggers sharing and you’ll see all the posts at the end of mine so be sure to come back throughout the week as the posts go live. 🙂

This post contains affiliate links. Please note, if you buy anything through the links, you never ever pay a penny more! You’re just helping support my little blog For my full disclosure, click here.
Bunnies hold a special place in our heart and I have a few that I decorate with for spring. Carrots seem to go hand in hand with bunnies and after seeing some cute carrot decor online, I thought I’d make my own.
The materials I used were:

- I started out with squares of muslin material measuring 7″ by 7″. These pieces actually came pre-cut from a lady who was giving away a bunch of material. I started at one end and rolled the material into a shape resembling a “cone”. I used my glue gun to glue the ends together. There really is no exact way of making the cone shape. I stuffed each “cone” with pillow.
- After I made my “cones” I used some sticks that I picked up from our yard and stuck them down into the fluff.
- Next I gathered the access material from the “cone” and folded it in and around the sticks. There’s really no right or wrong way to do this… just keep folding and gathering until all the material is tucked in.
- Using jute twine I tightly tied a knot around the base of the sticks. I then kept wrapping the twine around and around until most of the material was hidden. I used my glue gun to secure it and that was it!

There were such and easy and fun little craft to do with my little girl! You can use any material you have on had or be sure to look at thrift stores or yard sales for some that you like. You can often find some for a really good deal!

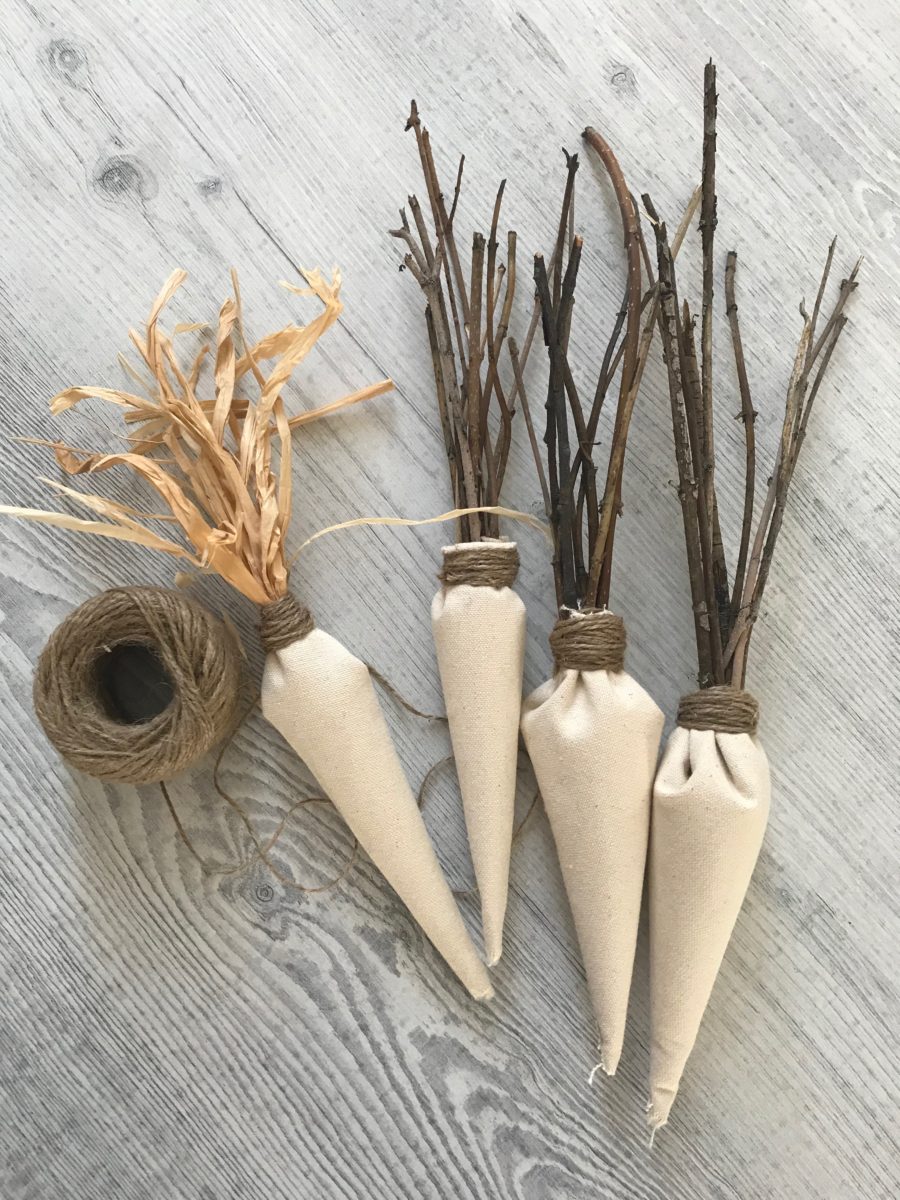
I have to share one more photo with you … the first carrot I actually made is the one on the left in the picture and I used raffia for the “greens” but I didn’t really liked the looks of it. I asked my husband and kids which one they liked better and let’s just say I was out numbered. Lol! I much preferred the stick top so now I’m curious which one you prefer? Or are you partial to one??
Now it’s time to head over to my friends Kristin and Vicki at
Timeless Creations and see the cute farmhouse planter boxes they made!!

DIY’s on Monday
Joy In Our Home | Timeless Creations |The Tattered Pew | CityGirlmeetsFarmboy | Life On Kaydeross Creek
Vignettes on Tuesday

anderson + grant | Follow The Yellow Brick Home | White Arrows Home | Worthing Court | Camelot Art Creations
Front Porches on Wednesday

Mantels on Thursday
County Road 407 | Elizabeth Joan Designs |The Crowned Goat | 2 Bees In A Pod | Sanctuary Home Decor

DIY Beautify | The Painted Hinge | Making It In the Mountains Grey Birch Designs | The Homemaking Momma
Recipes on Friday

Love In My Oven | Noting Grace | Beyond the Butter | Confessions of a Baking Queen | The Sugar Coated Cottage
Thanks so much for stopping by today,
